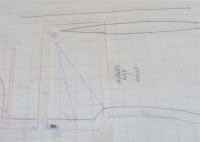
She is trying to alter McCall's 5138, which is an excellent choice for a first pattern to alter to match a sloper. The dart control closely matches that of a sloper: the pattern has both bust and waist darts on the front, and waist darts on the back.
Per her e-mail, Mrs. X faces the following challenges:
- forward neck and shoulders
- very narrow shoulders
- rounded back & shoulders
- low bust
- tummy & one hip lower, with a tilted back, due to an injury
I don't have a copy of Mrs. X's sloper - I've asked her to send me one via snail mail - as she doesn't have a digital camera or ability to upload pictures. But I'm going to take a stab at the alterations nonetheless. I'll send Mrs. X a link via e-mail so she can take a look and evaluate if these alterations make any sense.
You can click on the pictures to get a bigger version - just use the browser "back" button to return.
Mrs. X had a germane question - do you start with one size and then alter to match your sloper - or do you start by tracing the appropriate size at each level and alter from there?
And the answer is I'm not the person to answer that question. I'm self-taught, so I simply found it less confusing to use one consistent size, and then develop rules that I could use for every pattern. So I start with size 12, and have an algorithm that makes a size 12 match my sloper. At some point I really should compare my altered pattern to the original to see if it would be any easier to trace out different sizes.
Here's how I would alter for Mrs. X's forward neck & shoulder. For this alteration I'm following the advice in Fitting & Pattern Alteration: A Multi-Method Approach by Liechty, Pottberg & Rasband. It's described as variation #37 on pages 216-217 in my copy.
Next up: narrow shoulders. I found the alteration in Liechty confusing, so instead I'll do what I always do, which mostly does not affect the shape of the armhole.
Here's the marked slash lines.

One line runs perpendicular to the grain from the center back to where the shoulder meets the top of the armhole. In the seam allowance, slash to but not through where the shoulder meets the top of the armhole, creating a hinge.
Another line, at about midpoint of the shoulder, runs through the seam allowance to meet the first line. If the pattern had a back shoulder dart, it would run through the center of the dart.
And the third line is placed parallel to the grain from the point where the neck meets the shoulder to the first line. Again, slash to, but not through the seam allowance to create a hinge where the neck meets the shoulder.
Here I've spread to gain extra length in the center back and along the back of the shoulder, which should cover the rounded upper back and shoulder.

Things to note:
- I've keep the center back parallel to the grain, so the pattern should still be able to be cut on a fold.
- The hinge at the point where the shoulder meets the top of the armhole overlaps.
- The line at shoulder midpoint, the one that would be through the dart, opens up.
- And the line from the neck point overlaps, while its corresponding hinge overlaps.
- The shoulder is still a straight line and does not need to be trued.
| Here's the marked slash lines making a box around the side dart and including the pattern's marked bust point. |  |
| And here the whole shebang is moved down. Very quick and easy. |  |
I hope Mrs. X finds this post useful. I actually really enjoyed working through this exercise - I LOVE pattern puzzles!


2 comments:
Thank you so much for this - you make altering patterns look, if not easy, at least not difficult! I'm in the process of altering a sleeveless blouse, and may need to do the rounded back, will find out soon enough!
Thanks again,
Pearl in Vancouver
>> Pearl - good luck with the alteration!
Post a Comment